確認OpenVAS log訊息
/var/log/openvas/openvassd.log
Failed reading client-requested OTP version
/var/log/openvas/openvasmd.log
openvas_server_verify: the certificate is not trusted
openvas_server_verify: the certificate has expired
OpenVAS 憑證過期及重新產生處理方式:
openvas-mkcert -f
openvas-mkcert-client -i -n
restart all daemons
2014年12月25日 星期四
2014年3月10日 星期一
Postfix 版本升級
1. 至官方網站http://www.postfix.org/download.html下載安裝原始檔
2. 停用postfix,指令postfix stop
3. 編譯安裝檔,指令make
4. 開始安裝升級,指令make upgrade
5. 升級成功後,恢復啟用postfix,指令postfix start
2. 停用postfix,指令postfix stop
3. 編譯安裝檔,指令make
4. 開始安裝升級,指令make upgrade
5. 升級成功後,恢復啟用postfix,指令postfix start

2014年3月9日 星期日
ASUS RT-N66U 更新第三方Tomato Shibby 韌體
刷機進行步驟
1.下載並安裝ASUS RT-N66U B1 Firmware Restoration
2.下載最新版Tomato Shibby韌體 http://tomato.groov.pl/download/K26RT-N/
3.電腦網路孔透過網路線連接至ASUS RT-N66U LAN Port
4.將電腦IPv4 位址變更為192.168.1.x,子網路遮罩設定為255.255.255.0
5.執行 ASUS RT-N66U B1 Firmware Restoration,選擇要更新的韌體檔案,選擇完成後,先不要進行上傳
6.ASUS RT-N66U 概觀
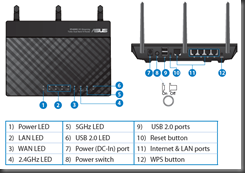
7.移除ASUS RT-N66U電源線後,持續按住ASUS RT-N66U背面Reset Button,再重新接回電源
8.當ASUS RT-N66U的電源燈號緩慢閃爍時,放開Reset Button並立即執行ASUS RT-N66U B1 Firmware Restoration上傳韌體
9.等待更新,更新完成後會提示進行重新啟動ASUS RT-N66U
10.更新完成後,若無法連線至ASUS RT-N66U網路管理介面,請清除NVRAM
清除NVRAM
方法1.手動清除
1.關閉ASUS RT-N66U電源
2.持續按住ASUS RT-N66U背面WPS Button,再重新接回電源
3.等待開機,約30秒後放開WPS Button
4.關閉ASUS RT-N66U電源,再接回電源,重新開機即完成
方法2.透過Tomato Shibby網路管理介面
1.登入網路管理介面
2.頁面選擇「Administration」->「Configuration」
3.「Restore Default Configuration」下拉式選單中,選擇「Erase all data in NVRAM memory (thorough)」,按OK
ASUS RT-N66U無線基地台詳細規格
http://www.asus.com/tw/Networking/RTN66U/#specifications
https://wikidevi.com/wiki/ASUS_RT-N66U
1.下載並安裝ASUS RT-N66U B1 Firmware Restoration
2.下載最新版Tomato Shibby韌體 http://tomato.groov.pl/download/K26RT-N/
3.電腦網路孔透過網路線連接至ASUS RT-N66U LAN Port
4.將電腦IPv4 位址變更為192.168.1.x,子網路遮罩設定為255.255.255.0
5.執行 ASUS RT-N66U B1 Firmware Restoration,選擇要更新的韌體檔案,選擇完成後,先不要進行上傳
6.ASUS RT-N66U 概觀

7.移除ASUS RT-N66U電源線後,持續按住ASUS RT-N66U背面Reset Button,再重新接回電源
8.當ASUS RT-N66U的電源燈號緩慢閃爍時,放開Reset Button並立即執行ASUS RT-N66U B1 Firmware Restoration上傳韌體
9.等待更新,更新完成後會提示進行重新啟動ASUS RT-N66U
10.更新完成後,若無法連線至ASUS RT-N66U網路管理介面,請清除NVRAM
清除NVRAM
方法1.手動清除
1.關閉ASUS RT-N66U電源
2.持續按住ASUS RT-N66U背面WPS Button,再重新接回電源
3.等待開機,約30秒後放開WPS Button
4.關閉ASUS RT-N66U電源,再接回電源,重新開機即完成
方法2.透過Tomato Shibby網路管理介面
1.登入網路管理介面
2.頁面選擇「Administration」->「Configuration」
3.「Restore Default Configuration」下拉式選單中,選擇「Erase all data in NVRAM memory (thorough)」,按OK
ASUS RT-N66U無線基地台詳細規格
http://www.asus.com/tw/Networking/RTN66U/#specifications
https://wikidevi.com/wiki/ASUS_RT-N66U
2014年3月6日 星期四
Logwatch設定自動寄送紀錄檔
編輯設定檔
#vim /etc/logwatch/conf/logwatch.conf
MailTo = aaa@abc.com.tw, bbb@@abc.com.tw #加入欲收到的電子郵件信箱
MailFrom = Logwatch #寄件者名稱
預設參數設定檔位置 /usr/share/logwatch/default.conf/logwatch.conf
#vim /etc/logwatch/conf/logwatch.conf
MailTo = aaa@abc.com.tw, bbb@@abc.com.tw #加入欲收到的電子郵件信箱
MailFrom = Logwatch #寄件者名稱
預設參數設定檔位置 /usr/share/logwatch/default.conf/logwatch.conf
2014年3月5日 星期三
mailx 指令使用說明
mailx是在Linux CLI介面下,一個提供簡單收發信件的套件
可透過執行 mailx –f /var/mail/使用者帳號
查看信件,內容包含5個欄位(1.信件編號 2.寄件人 3.時間日期 4.檔案大小Byte 5.信件標題)
輸入信件編號,即可觀看該封信件內容
輸入h,按Enter,為列出郵件列表
輸入z,按Enter ,為下一頁
輸入z-,按Enter,為上一頁
輸入d3,按Enter,為刪除信件編號3之郵件
輸入d5-7,按Enter,為刪除信件編號5、6及7之郵件
輸入q,按Enter,為離開mailx程式
可透過執行 mailx –f /var/mail/使用者帳號
查看信件,內容包含5個欄位(1.信件編號 2.寄件人 3.時間日期 4.檔案大小Byte 5.信件標題)
輸入信件編號,即可觀看該封信件內容
輸入h,按Enter,為列出郵件列表
輸入z,按Enter ,為下一頁
輸入z-,按Enter,為上一頁
輸入d3,按Enter,為刪除信件編號3之郵件
輸入d5-7,按Enter,為刪除信件編號5、6及7之郵件
輸入q,按Enter,為離開mailx程式
Extreme XOS switch安裝SSH image
How to load SSH image in XOS switch
1. Use ‘show switch’ & ‘show
version’ to check current running s/w version, the ssh image version must be
same as running version
X450a -24t.1
# show switch
SysName: X450a -24t
SysLocation:
SysContact: support@extremenetworks.com, +1 888 257
3000
System MAC: 00:04:96:35:9C :49
System Type: X450a -24t
SysHealth check: Enabled (Normal
Recovery Mode: All
System Watchdog: Enabled
Current Time: Mon Sep 21
13:20:27 2009
Timezone: [Auto DST
Disabled] GMT Offset: 0 minutes, name is UTC.
Boot Time: Mon Sep 21
12:34:21 2009
Boot Count: 12
Next Reboot: None
scheduled
System UpTime: 46 minutes 6
seconds
Image Selected: primary
Image Booted: primary
Primary ver: 12.2.2 .11
Secondary ver: 12.2.2 .11
Config Selected: secondary.cfg
Config Booted: secondary.cfg
secondary.cfg Created by
ExtremeXOS version 12.2.2 .11
85309 bytes
saved on Fri Sep 18 14:11:51 2009
X450a -24t.2 #
show version
Switch: 800152-00-08 0842G -82093
Rev 8.0 BootROM: 1.0.3 .5 IMG: 12.2.2.11
XGM2-1: N/A N/A Rev 0.0
Image: ExtremeXOS version 12.2.2 .11
v1222b11-patch1-8 by release-manager on Thu Jul 16
18:32:28 PDT 2009
BootROM : 1.0.3 .5
X450a -24t.3 #
2. Download ssh image to the same partition(primary
or secondary) of running image, that have the same version number.
X450a -24t.4 #
download image 192.168.172.65 summitX-12.2.2 .11-patch1-10-ssh.xmod
vr "VR-Default" primary
Do you want to install image after downloading? (y - yes, n - no,
- cancel) Yes
Downloading to Switch..
Installing to primary partition!
Installing to Switch......................................
SSL will be usable after restart of thttpd process.
Image installed successfully
X450a -24t.4 #
3. Online update the running s/w
without reboot switch
X450a -24t.5
# run update
4. Check the ssh function has been
load
X450a -24t.7
# show management
CLI idle timeout : Enabled (20 minutes)
CLI max number of login attempts : 3
CLI max number of sessions : 8
CLI paging : Enabled (this session only)
CLI space-completion : Disabled (this session only)
CLI configuration logging : Disabled
CLI scripting : Disabled (this session only)
CLI scripting error mode : Ignore-Error (this session only)
CLI persistent mode : Persistent (this session only)
Telnet access : Enabled (tcp port 23 vr all)
: Access Profile : not set
SSH access : Disabled (Key invalid,
tcp port 22 vr all)
: Access Profile : not set
Web access : Disabled (tcp port 80)
Total Read Only Communities : 1
Total Read Write Communities : 1
RMON : Disabled
SNMP access : Enabled
: Access Profile Name : not set
SNMP Traps : Enabled
SNMP v1/v2c
TrapReceivers : None
SNMP stats: InPkts 0 OutPkts 0 Errors 0 AuthErrors 0
Gets 0
GetNexts 0 Sets 0
SNMP traps: Sent 0
AuthTraps Enabled
5. Enable ssh access
X450a -24t.8 # enable ssh2
WARNING: Generating new server host key
This could take approximately 10 minutes and cannot be
canceled. Continue? (y/N) Yes
....................................................................................................................................................................................Key
Generated
X450a -24t.9 #
6. Now, the ssh module has
intalled and running
KMS認證指令
Windows Vista / Windows 7 / Windows 8
(1)以系統管理員身份(權限)開啟命令提示字元視窗
(2)指定認證主機,輸入指令
C:\windows\system32\slmgr -skms xxx.xxx.xxx.xxx:1688
(3)啟動授權
C:\windows\system32\slmgr -ato
Office 2010
(1)以系統管理員身份(權限)開啟命令提示字元視窗
(2)依安裝Office 32/64位元版本,至指定目錄下輸入指令
Office 64位元版本
C:\Program Files\Microsoft Office\Office14\cscript ospp.vbs /sethst:xxx.xxx.xxx.xxx
C:\Program Files\Microsoft Office\Office14\cscript ospp.vbs /act
Office 32位元版本
C:\Program Files(x86)\Microsoft Office\Office14\cscript ospp.vbs /sethst:xxx.xxx.xxx.xxx
C:\Program Files(x86)\Microsoft Office\Office14\cscript ospp.vbs /act
Office 2013
(1)以系統管理員身份(權限)開啟命令提示字元視窗
(2)依安裝Office 32/64位元版本,至指定目錄下輸入指令
Office 64位元版本
C:\Program Files\Microsoft Office\Office15\cscript ospp.vbs /sethst:xxx.xxx.xxx.xxx
C:\Program Files\Microsoft Office\Office15\cscript ospp.vbs /act
Office 32位元版本
C:\Program Files(x86)\Microsoft Office\Office15\cscript ospp.vbs /sethst:xxx.xxx.xxx.xxx
C:\Program Files(x86)\Microsoft Office\Office15\cscript ospp.vbs /act
slmgr 指令基本用法
(1)變更產品金鑰 slmg.vbs -ipk +產品金鑰
(2)顯示啟用狀態(如啟用到期日期) slmg.vbs -xpr
(3)顯示啟用狀態(如詳細的啟用識別資訊) slmg.vbs -dlv
ospp.vbs 指令基本用法
(1)顯示所安裝產品金鑰的授權資訊 cscript ospp.vbs /dstatus
(2)顯示所有安裝授權的授權資訊 cscript ospp.vbs /dstatusall
(3)顯示KMS用戶端啟用記錄 cscript ospp.vbs /dhistorykms
(1)以系統管理員身份(權限)開啟命令提示字元視窗
(2)指定認證主機,輸入指令
C:\windows\system32\slmgr -skms xxx.xxx.xxx.xxx:1688
(3)啟動授權
C:\windows\system32\slmgr -ato
Office 2010
(1)以系統管理員身份(權限)開啟命令提示字元視窗
(2)依安裝Office 32/64位元版本,至指定目錄下輸入指令
Office 64位元版本
C:\Program Files\Microsoft Office\Office14\cscript ospp.vbs /sethst:xxx.xxx.xxx.xxx
C:\Program Files\Microsoft Office\Office14\cscript ospp.vbs /act
Office 32位元版本
C:\Program Files(x86)\Microsoft Office\Office14\cscript ospp.vbs /sethst:xxx.xxx.xxx.xxx
C:\Program Files(x86)\Microsoft Office\Office14\cscript ospp.vbs /act
Office 2013
(1)以系統管理員身份(權限)開啟命令提示字元視窗
(2)依安裝Office 32/64位元版本,至指定目錄下輸入指令
Office 64位元版本
C:\Program Files\Microsoft Office\Office15\cscript ospp.vbs /sethst:xxx.xxx.xxx.xxx
C:\Program Files\Microsoft Office\Office15\cscript ospp.vbs /act
Office 32位元版本
C:\Program Files(x86)\Microsoft Office\Office15\cscript ospp.vbs /sethst:xxx.xxx.xxx.xxx
C:\Program Files(x86)\Microsoft Office\Office15\cscript ospp.vbs /act
slmgr 指令基本用法
(1)變更產品金鑰 slmg.vbs -ipk +產品金鑰
(2)顯示啟用狀態(如啟用到期日期) slmg.vbs -xpr
(3)顯示啟用狀態(如詳細的啟用識別資訊) slmg.vbs -dlv
ospp.vbs 指令基本用法
(1)顯示所安裝產品金鑰的授權資訊 cscript ospp.vbs /dstatus
(2)顯示所有安裝授權的授權資訊 cscript ospp.vbs /dstatusall
(3)顯示KMS用戶端啟用記錄 cscript ospp.vbs /dhistorykms
訂閱:
文章 (Atom)